Updating Plan and Apply Roles
This guide is specifically for infrastructure-live repositories that use the terragrunt-scale-catalog. For repositories using the Account Factory, see Configuring IAM Roles.
When Pipelines is installed, it creates two roles in your cloud account: a Plan role and an Apply role. The Plan role is used during pull/merge requests and provides read-only access to your cloud resources. The Apply role provides write access and is only used on your Deploy Branch. Pipelines enforces this separation through the OIDC handshake between your repository and the cloud, so Terragrunt can only authenticate with the Apply role when running on the Deploy Branch.
This guide walks through how to modify these roles when you need to grant Pipelines access to different types of cloud resources.
Identifying existing roles
- AWS
- Azure
- GCP
Your plan and apply roles are managed by the bootstrap stack in your repository. Replace <ACCOUNT_NAME> with the name of the account you are working with. This stack is initially created at:
<ACCOUNT_NAME>/_global/bootstrap/terragrunt.stack.hcl
This stack sources the pipelines-bootstrap stack from the Terragrunt Scale Catalog (GitHub | GitLab).
The role names are determined by the oidc_resource_prefix stack value, which defaults to pipelines. This creates two IAM roles in your AWS account:
<oidc_resource_prefix>-plan(e.g.,pipelines-plan)<oidc_resource_prefix>-apply(e.g.,pipelines-apply)
The oidc_resource_prefix is frequently customized to include a random prefix to prevent naming collisions with existing resources in your account.
The IAM policies attached to these roles are controlled by the bootstrap_iam_policy stack value defined in the pipelines-bootstrap stack. This value defaults to default, which tells the stack to load default_plan_iam_policy.json (GitHub | GitLab) and default_apply_iam_policy.json (GitHub | GitLab) as the role policies. A restrictive option is also available, which provides a more locked-down set of permissions.
You can also override the policies entirely by passing custom JSON directly via the plan_iam_policy and apply_iam_policy stack values.
Your plan and apply roles are managed by the bootstrap stack in your repository. Replace <SUBSCRIPTION_NAME> with the name of the subscription you are working with. This stack is initially created at:
<SUBSCRIPTION_NAME>/bootstrap/terragrunt.stack.hcl
This stack sources the pipelines-bootstrap stack from the Terragrunt Scale Catalog (GitHub | GitLab).
The resource names are determined by the oidc_resource_prefix stack value, which defaults to pipelines. This creates the following resources in your Azure subscription:
- Entra ID applications:
<oidc_resource_prefix>-planand<oidc_resource_prefix>-apply(e.g.,pipelines-plan,pipelines-apply) - Service principals for each application
- Custom role definitions:
<oidc_resource_prefix>-plan-custom-roleand<oidc_resource_prefix>-apply-custom-role
The oidc_resource_prefix is frequently customized to include a random prefix to prevent naming collisions with existing resources in your subscription.
The permissions granted to each role are controlled by custom Azure RBAC role definitions. The default actions are defined in the pipelines-bootstrap stack (GitHub | GitLab). The plan role gets read-only access (*/read plus state storage access), while the apply role gets broader permissions for managing resource groups, deployments, storage, and role assignments.
You can override these by passing custom action lists via the plan_custom_role_actions and apply_custom_role_actions stack values.
Your plan and apply service accounts are managed by the bootstrap stack in your repository. Replace <PROJECT_NAME> with the name of the GCP project you are working with. This stack is initially created at:
<PROJECT_NAME>/bootstrap/terragrunt.stack.hcl
This stack sources the pipelines-bootstrap stack from the Terragrunt Scale Catalog (GitHub | GitLab).
The service account names are determined by the OIDCResourcePrefix stack value, which defaults to pipelines. This creates two GCP service accounts in your project:
<OIDCResourcePrefix>-plan(e.g.,pipelines-plan)<OIDCResourcePrefix>-apply(e.g.,pipelines-apply)
The IAM roles granted to each service account are controlled by the PlanRoles and ApplyRoles stack values. By default, the plan service account receives roles/viewer and roles/storage.objectViewer, while the apply service account receives a broader set of admin roles. You can override these by passing custom role lists directly via the PlanRoles and ApplyRoles stack values.
Customizing roles
The following example walks through adding permissions for a new cloud service to your plan and apply roles.
- AWS
- Azure
- GCP
In this example, we'll add SageMaker permissions, but the same approach works for any AWS service.
1. Copy the default policy files
Start by downloading the default policy files from the Terragrunt Scale Catalog into your bootstrap directory. We'll rename them to custom_ to indicate they're your own versions:
- GitHub
- GitLab
curl -o <ACCOUNT_NAME>/_global/bootstrap/custom_plan_iam_policy.json \
  https://raw.githubusercontent.com/gruntwork-io/terragrunt-scale-catalog/main/stacks/aws/github/pipelines-bootstrap/default_plan_iam_policy.json

curl -o <ACCOUNT_NAME>/_global/bootstrap/custom_apply_iam_policy.json \
  https://raw.githubusercontent.com/gruntwork-io/terragrunt-scale-catalog/main/stacks/aws/github/pipelines-bootstrap/default_apply_iam_policy.json
curl -o <ACCOUNT_NAME>/_global/bootstrap/custom_plan_iam_policy.json \
  https://raw.githubusercontent.com/gruntwork-io/terragrunt-scale-catalog/main/stacks/aws/gitlab/pipelines-bootstrap/default_plan_iam_policy.json

curl -o <ACCOUNT_NAME>/_global/bootstrap/custom_apply_iam_policy.json \
  https://raw.githubusercontent.com/gruntwork-io/terragrunt-scale-catalog/main/stacks/aws/gitlab/pipelines-bootstrap/default_apply_iam_policy.json
2. Add SageMaker permissions
Add read-only SageMaker access to your plan role policy. Open custom_plan_iam_policy.json and add a new entry to the Statement array alongside the existing statements:
{
  "Version": "2012-10-17",
  "Statement": [
    // ... existing statements ...
    {
      "Sid": "SageMakerReadOnlyAccess",
      "Effect": "Allow",
      "Action": [
        "sagemaker:Describe*",
        "sagemaker:List*",
        "sagemaker:Get*"
      ],
      "Resource": "*"
    }
  ]
}
Then add full SageMaker access to your apply role policy. Open custom_apply_iam_policy.json and add a new entry to the Statement array:
{
  "Version": "2012-10-17",
  "Statement": [
    // ... existing statements ...
    {
      "Sid": "SageMakerAccess",
      "Effect": "Allow",
      "Action": [
        "sagemaker:*"
      ],
      "Resource": "*"
    }
  ]
}
3. Load your custom policies in the bootstrap stack
Update your terragrunt.stack.hcl to pass the custom policy files to the bootstrap stack. Set plan_iam_policy and apply_iam_policy in the values block, using templatefile to load the JSON (the ${state_bucket_name} template variable is used in the policies for state bucket access):
stack {
  # ... your existing stack configuration ...
  # Your locals block should already contain:
  #   account_hcl = read_terragrunt_config(find_in_parent_folders("account.hcl"))

  values = {
    # ... your existing values ...

    plan_iam_policy = templatefile("${get_terragrunt_dir()}/custom_plan_iam_policy.json", {
      state_bucket_name = local.account_hcl.locals.state_bucket_name
    })
    apply_iam_policy = templatefile("${get_terragrunt_dir()}/custom_apply_iam_policy.json", {
      state_bucket_name = local.account_hcl.locals.state_bucket_name
    })
  }
}
4. Deploy the changes via Pipelines
- Create a new branch with your changes.
- Open a pull/merge request targeting your Deploy Branch. Pipelines will run a plan showing the IAM policy updates.
- Review the plan output to confirm the policy changes match what you expect.
- Merge the pull/merge request. Pipelines will apply the updated IAM policies to your plan and apply roles.
In this example, we'll add Azure Machine Learning permissions, but the same approach works for any Azure resource provider.
Azure permissions are defined as action lists directly in the stack values.
1. Copy the default actions from the catalog
The default plan and apply actions are defined in the default_plan_custom_role_actions and default_apply_custom_role_actions locals in the catalog's terragrunt.stack.hcl (GitHub | GitLab). These are not present in your repository's terragrunt.stack.hcl by default, so you need to copy them as a starting point.
2. Add your new actions and set them in the bootstrap stack
Update your terragrunt.stack.hcl to set plan_custom_role_actions and apply_custom_role_actions in the values block. Start with the default actions you copied from the catalog, then add your new permissions:
stack {
  # ... your existing stack configuration ...

  values = {
    # ... your existing values ...

    plan_custom_role_actions = [
      # Default actions (copied from the catalog)
      "*/read",
      "Microsoft.Resources/subscriptions/resourceGroups/read",
      "Microsoft.Resources/deployments/read",
      "Microsoft.Resources/deployments/operations/read",
      "Microsoft.Storage/storageAccounts/listKeys/action",
      "Microsoft.Storage/storageAccounts/blobServices/containers/read",
      # Add Machine Learning read access
      "Microsoft.MachineLearningServices/*/read",
    ]

    apply_custom_role_actions = [
      # Default actions (copied from the catalog)
      "*/read",
      "Microsoft.Resources/subscriptions/resourceGroups/*",
      "Microsoft.Resources/deployments/*",
      "Microsoft.Storage/storageAccounts/*",
      "Microsoft.Storage/storageAccounts/blobServices/*",
      "Microsoft.Storage/storageAccounts/blobServices/containers/*",
      "Microsoft.Storage/storageAccounts/fileServices/*",
      "Microsoft.Storage/storageAccounts/queueServices/*",
      "Microsoft.Storage/storageAccounts/tableServices/*",
      "Microsoft.Authorization/roleAssignments/*",
      "Microsoft.Authorization/roleDefinitions/*",
      "Microsoft.Authorization/locks/read",
      "Microsoft.Authorization/policyAssignments/read",
      # Add Machine Learning full access
      "Microsoft.MachineLearningServices/*",
    ]
  }
}
When you set plan_custom_role_actions or apply_custom_role_actions, you replace the entire default list from the catalog. Make sure to include all the default actions alongside your additions.
3. Deploy the changes via Pipelines
- Create a new branch with your changes.
- Open a pull/merge request targeting your Deploy Branch. Pipelines will run a plan showing the custom role definition updates.
- Review the plan output to confirm the action list changes match what you expect.
- Merge the pull/merge request. Pipelines will apply the updated custom role definitions.
In this example, we'll add Vertex AI permissions, but the same approach works for any GCP service.
GCP permissions are defined as lists of IAM role strings directly in the stack values — no separate policy files are needed.
1. Update the bootstrap stack with your new roles
Update your terragrunt.stack.hcl to set PlanRoles and ApplyRoles in the values block. Start with the default roles from the catalog, then add your new permissions:
stack {
  # ... your existing stack configuration ...

  values = {
    # ... your existing values ...

    PlanRoles = [
      # Default roles
      "roles/viewer",
      "roles/storage.objectViewer",
      # Add Vertex AI read access
      "roles/aiplatform.viewer",
    ]

    ApplyRoles = [
      # Default roles
      "roles/compute.admin",
      "roles/container.admin",
      "roles/cloudsql.admin",
      "roles/iam.roleAdmin",
      "roles/resourcemanager.projectIamAdmin",
      "roles/storage.admin",
      "roles/compute.networkAdmin",
      "roles/run.admin",
      "roles/pubsub.admin",
      "roles/dns.admin",
      "roles/secretmanager.admin",
      "roles/bigquery.admin",
      "roles/iam.serviceAccountAdmin",
      "roles/iam.serviceAccountUser",
      "roles/serviceusage.serviceUsageAdmin",
      # Add Vertex AI full access
      "roles/aiplatform.admin",
    ]
  }
}
When you set PlanRoles or ApplyRoles, you replace the entire default list from the catalog. Make sure to include all the default roles alongside your additions.
2. Deploy the changes via Pipelines
- Create a new branch with your changes.
- Open a pull/merge request targeting your Deploy Branch. Pipelines will run a plan showing the IAM binding updates.
- Review the plan output to confirm the role changes match what you expect.
- Merge the pull/merge request. Pipelines will apply the updated IAM bindings to your plan and apply service accounts.
Inspecting roles in the console
- AWS
- Azure
- GCP
Replace <OIDC_RESOURCE_PREFIX> with your oidc_resource_prefix value from the bootstrap stack (e.g., pipelines).
To verify your roles in the AWS console:
- Navigate to IAM > Roles in the AWS Management Console.
- Search for your prefix. You should see two roles:
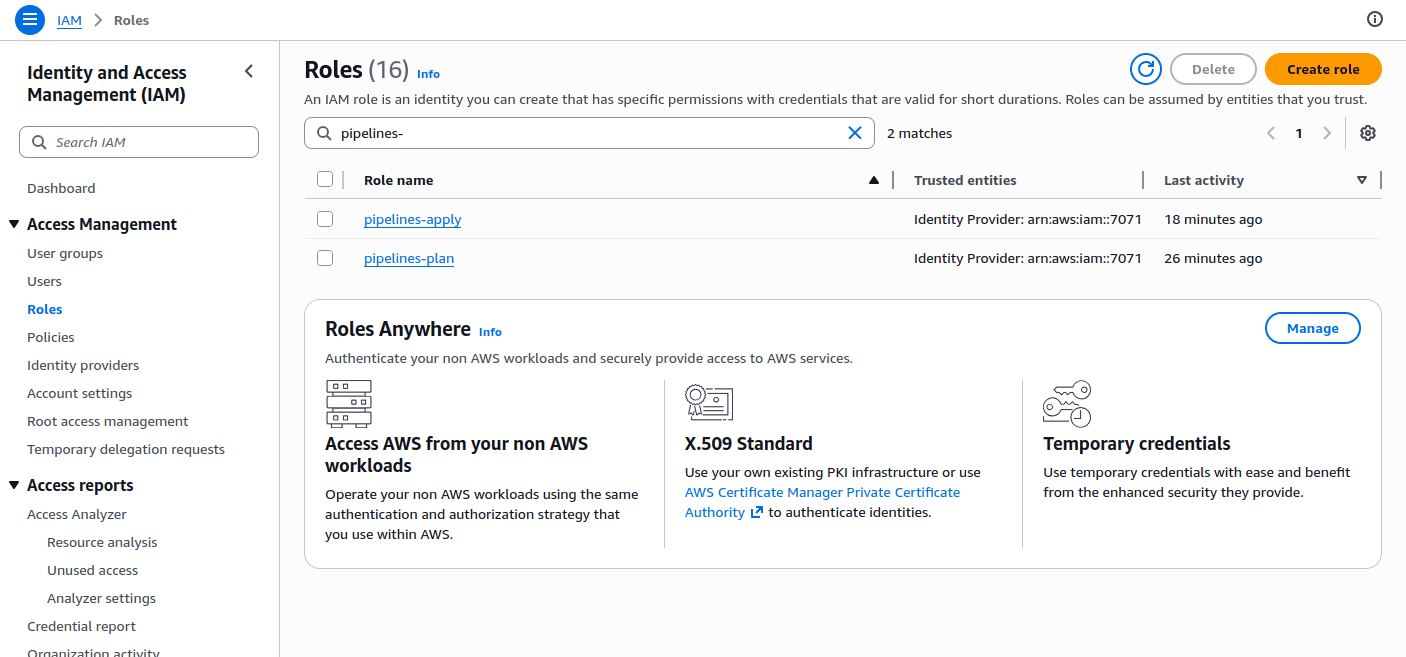 IAM Roles in the AWS Console
- <OIDC_RESOURCE_PREFIX>-plan
- <OIDC_RESOURCE_PREFIX>-apply
- Click on either role, select the Permissions tab, and expand the policy under Permissions policies. After deploying your changes, you should see the new permissions (e.g., SageMaker actions) reflected here.
- Select the Trust relationships tab to verify the OIDC trust policy. The plan role uses a
StringLikecondition allowing any branch, while the apply role usesStringEqualsrestricting access to your Deploy Branch.
Replace <OIDC_RESOURCE_PREFIX> with your oidc_resource_prefix value from the bootstrap stack (e.g., pipelines).
To verify your Entra ID applications and custom roles in the Azure Portal:
- Navigate to Microsoft Entra ID > Manage > App registrations and search for your prefix. You should see two applications:
- <OIDC_RESOURCE_PREFIX>-plan
- <OIDC_RESOURCE_PREFIX>-apply
- Click on either application and select Manage > Certificates & secrets > Federated credentials to verify the OIDC federation. The plan application uses a flexible federated identity credential (allowing any branch), while the apply application uses a federated identity credential restricted to your Deploy Branch.
- To inspect the custom role definitions, navigate to your Subscription > Access control (IAM) > Roles. Search for your prefix to find:
- <OIDC_RESOURCE_PREFIX>-plan-custom-role
- <OIDC_RESOURCE_PREFIX>-apply-custom-role
- Click on either role, select View, then the Permissions tab to review the action list. After deploying your changes, you should see the new actions (e.g.,
Microsoft.MachineLearningServices/*) reflected here.
Replace <OIDC_RESOURCE_PREFIX> with your OIDCResourcePrefix value from the bootstrap stack (e.g., pipelines) and <GCP_PROJECT_ID> with your GCP project ID.
To verify your service accounts and IAM bindings in the Google Cloud Console:
- Navigate to IAM & Admin > Service Accounts in the Google Cloud Console.
- Search for your prefix. You should see two service accounts:
- <OIDC_RESOURCE_PREFIX>-plan@<GCP_PROJECT_ID>.iam.gserviceaccount.com
- <OIDC_RESOURCE_PREFIX>-apply@<GCP_PROJECT_ID>.iam.gserviceaccount.com
- To verify the IAM roles granted to each service account, navigate to IAM & Admin > IAM, then filter by the service account email. After deploying your changes, you should see the new roles (e.g.,
roles/aiplatform.admin) reflected here. - To inspect the Workload Identity bindings, click on a service account, select the Permissions tab, and review the principals granted
Workload Identity Useraccess.