Deploying your first Infrastructure Change
In this tutorial, we will guide you through deploying cloud storage. This "hello world" example introduces Gruntwork Pipelines and lays the groundwork for using it in production environments.
What you'll get
By the end of this tutorial, you will have:
- Cloud storage deployed automatically using Gruntwork Pipelines:
- AWS: An S3 bucket
- Azure: A Resource Group and Storage Account
- GCP: A GCS bucket
Prerequisites
Before starting, ensure you have the following:
- Pipelines installed in a GitHub or GitLab repository. Refer to Setup & Installation for more details.
- Access to a sandbox or development cloud environment (AWS account or Azure subscription) configured during the Pipelines installation process.
- Permissions to create a pull request in the GitHub/GitLab repository where Pipelines is installed.
Running Your first pipeline
This section covers creating a cloud storage resource using Pipelines and GitOps workflows. You will define a terragrunt.hcl file to create storage, push the changes, create a pull/merge request to trigger a plan action, and merge the request to run an apply action that creates the resource.
Adding cloud storage
- AWS
- Azure
- GCP
By default, Pipelines is configured with the permissions needed to complete this tutorial. However, depending on your specific setup, you may need to adjust the IAM roles used by Pipelines to ensure they have the necessary permissions.
The default Pipelines role has permissions to create S3 buckets with names that start with test-pipelines-. If you want to use a different bucket name, you may need to update the IAM policy accordingly.
The default bootstrap Terragrunt stack provided in the installation guide includes plan_iam_policy and apply_iam_policy values that can be configured to adjust the permissions granted to Pipelines.
:::
-
Create the folder structure for the new S3 bucket in your environment. Replace <ACCOUNT_NAME> with the account name you are deploying to and <REGION> with the AWS region where the S3 bucket will be deployed.
mkdir -p '<ACCOUNT_NAME>/<REGION>/data-storage/s3'
touch '<ACCOUNT_NAME>/<REGION>/region.hcl'
touch '<ACCOUNT_NAME>/<REGION>/data-storage/s3/terragrunt.hcl' -
Add the following content to the
region.hclfile created earlier.<ACCOUNT_NAME>/<REGION>/region.hcllocals {
aws_region = "<REGION>"
} -
Add the Terragrunt code below to the newly created
terragrunt.hclfile to define the S3 bucket. Replace <S3_BUCKET_NAME> with your desired bucket name. Ensure the bucket name is unique.<ACCOUNT_NAME>/<REGION>/data-storage/s3/terragrunt.hclterraform {
source = "github.com/gruntwork-io/terragrunt-scale-catalog//modules/aws/s3-bucket?ref=v1.11.0"
}
include "root" {
path = find_in_parent_folders("root.hcl")
}
inputs = {
name = "<S3_BUCKET_NAME>"
}
By default, Pipelines is configured with the permissions needed to complete this tutorial. However, depending on your specific setup, you may need to adjust the role used by Pipelines to ensure it has the appropriate permissions to create Resource Groups and Storage Accounts in your subscription.
The default bootstrap Terragrunt stack provided in the installation guide includes plan_custom_role_actions and apply_custom_role_actions values that can be configured to adjust the permissions granted to Pipelines.
:::
-
Create the folder structure for the new Resource Group and Storage Account in your environment. Replace <SUBSCRIPTION_NAME> with the subscription name you are deploying to, <LOCATION> with the Azure location where the resources will be deployed, and <RESOURCE_GROUP_NAME> with your desired resource group name.
mkdir -p '<SUBSCRIPTION_NAME>/<LOCATION>/resource-groups/<RESOURCE_GROUP_NAME>/resource-group'
mkdir -p '<SUBSCRIPTION_NAME>/<LOCATION>/resource-groups/<RESOURCE_GROUP_NAME>/data-storage/storage-account'
touch '<SUBSCRIPTION_NAME>/<LOCATION>/region.hcl'
touch '<SUBSCRIPTION_NAME>/<LOCATION>/resource-groups/<RESOURCE_GROUP_NAME>/resource-group/terragrunt.hcl'
touch '<SUBSCRIPTION_NAME>/<LOCATION>/resource-groups/<RESOURCE_GROUP_NAME>/data-storage/storage-account/terragrunt.hcl' -
Add the following content to the
region.hclfile created earlier.<SUBSCRIPTION_NAME>/<LOCATION>/region.hcllocals {
azure_location = "<LOCATION>"
} -
Add the Terragrunt code below to define the Resource Group.
<SUBSCRIPTION_NAME>/<LOCATION>/resource-groups/<RESOURCE_GROUP_NAME>/resource-group/terragrunt.hclinclude "root" {
path = find_in_parent_folders("root.hcl")
}
terraform {
source = "github.com/gruntwork-io/terragrunt-scale-catalog//modules/azure/resource-group?ref=v1.11.0"
}
inputs = {
name = "<RESOURCE_GROUP_NAME>"
location = "<LOCATION>"
} -
Add the Terragrunt code below to define the Storage Account with a dependency on the Resource Group. Replace <STORAGE_ACCOUNT_NAME> with your desired storage account name. Ensure the name is unique and follows Azure naming conventions (lowercase letters and numbers only, 3-24 characters).
<SUBSCRIPTION_NAME>/<LOCATION>/resource-groups/<RESOURCE_GROUP_NAME>/data-storage/storage-account/terragrunt.hclinclude "root" {
path = find_in_parent_folders("root.hcl")
}
terraform {
source = "github.com/gruntwork-io/terragrunt-scale-catalog//modules/azure/storage-account?ref=v1.11.0"
}
dependency "resource_group" {
config_path = "../../resource-group"
mock_outputs = {
name = "mock-name"
}
}
inputs = {
name = "<STORAGE_ACCOUNT_NAME>"
location = "<LOCATION>"
resource_group_name = dependency.resource_group.outputs.name
}
By default, Pipelines is configured with the permissions needed to complete this tutorial. However, depending on your specific setup, you may need to adjust the IAM roles used by Pipelines to ensure they have the necessary permissions.
The default apply service account has permissions to create GCS buckets. If you need to use a different set of permissions, you can update the ApplyRoles variable when bootstrapping.
The default bootstrap Terragrunt stack provided in the installation guide includes PlanRoles and ApplyRoles values that can be configured to adjust the permissions granted to Pipelines.
:::
-
Create the folder structure for the new GCS bucket in your environment. Replace <PROJECT_NAME> with the project name you are deploying to and <REGION> with the GCP region where the bucket will be deployed.
mkdir -p '<PROJECT_NAME>/<REGION>/data-storage/gcs'
touch '<PROJECT_NAME>/<REGION>/data-storage/gcs/terragrunt.hcl' -
Add the Terragrunt code below to the newly created
terragrunt.hclfile to define the GCS bucket. Replace <GCS_BUCKET_NAME> with your desired bucket name. Ensure the bucket name is globally unique.<PROJECT_NAME>/<REGION>/data-storage/gcs/terragrunt.hcllocals {
project_hcl = read_terragrunt_config(find_in_parent_folders("project.hcl"))
gcp_project_id = local.project_hcl.locals.gcp_project_id
}
terraform {
source = "github.com/gruntwork-io/terragrunt-scale-catalog//modules/gcp/storage-bucket?ref=v1.11.0"
}
include "root" {
path = find_in_parent_folders("root.hcl")
}
inputs = {
project_id = local.gcp_project_id
name = "<GCS_BUCKET_NAME>"
location = "<REGION>"
}
Planning the changes
- GitHub
- GitLab
- Create a new branch for your changes.
- Commit the changes to your branch and push it.
- Create a pull request (PR) against
main(the default branch in your repository). Refer to this GitHub tutorial for instructions on creating a PR.
After creating the PR, GitHub Actions will automatically execute the workflow defined in /.github/workflows/pipelines.yml in your repository.
Once the workflow completes, Pipelines will post a comment on the PR summarizing the terragrunt plan output along with a link to the GitHub Actions workflow logs.
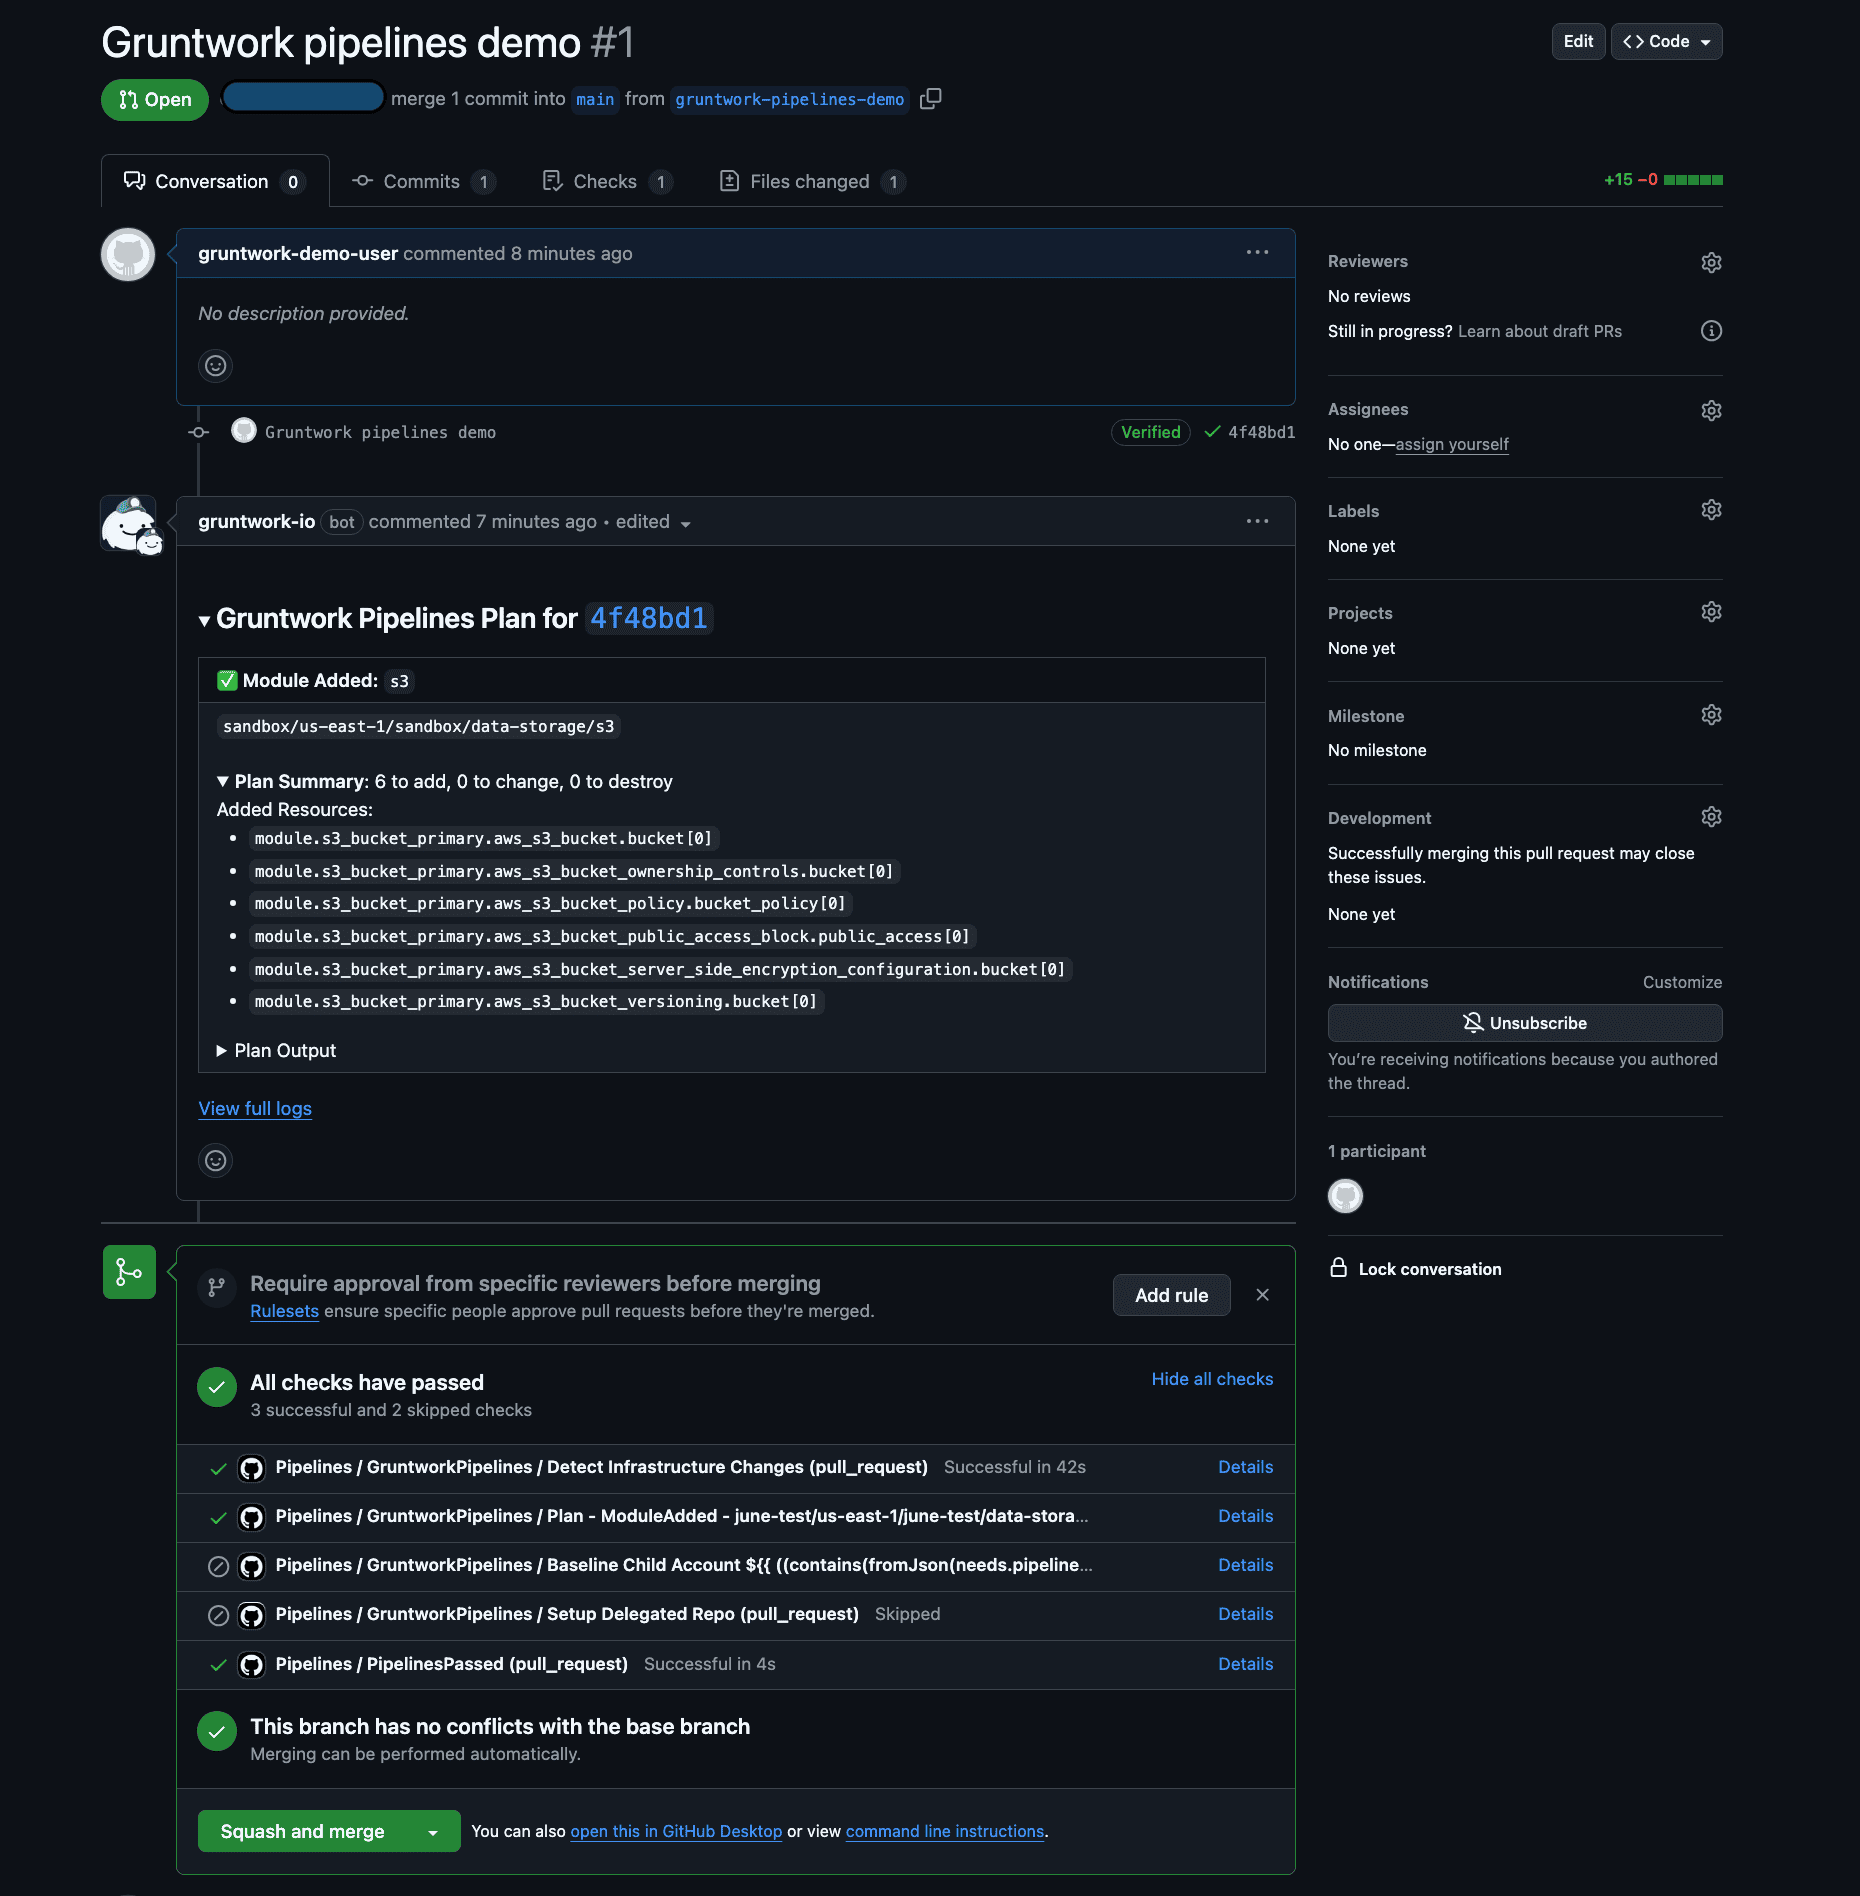 Pipelines Plan Comment
Click the View full logs link to see the complete output of the Gruntwork Pipelines run. Locate the TerragruntExecute step to review the full terragrunt plan generated by your changes.
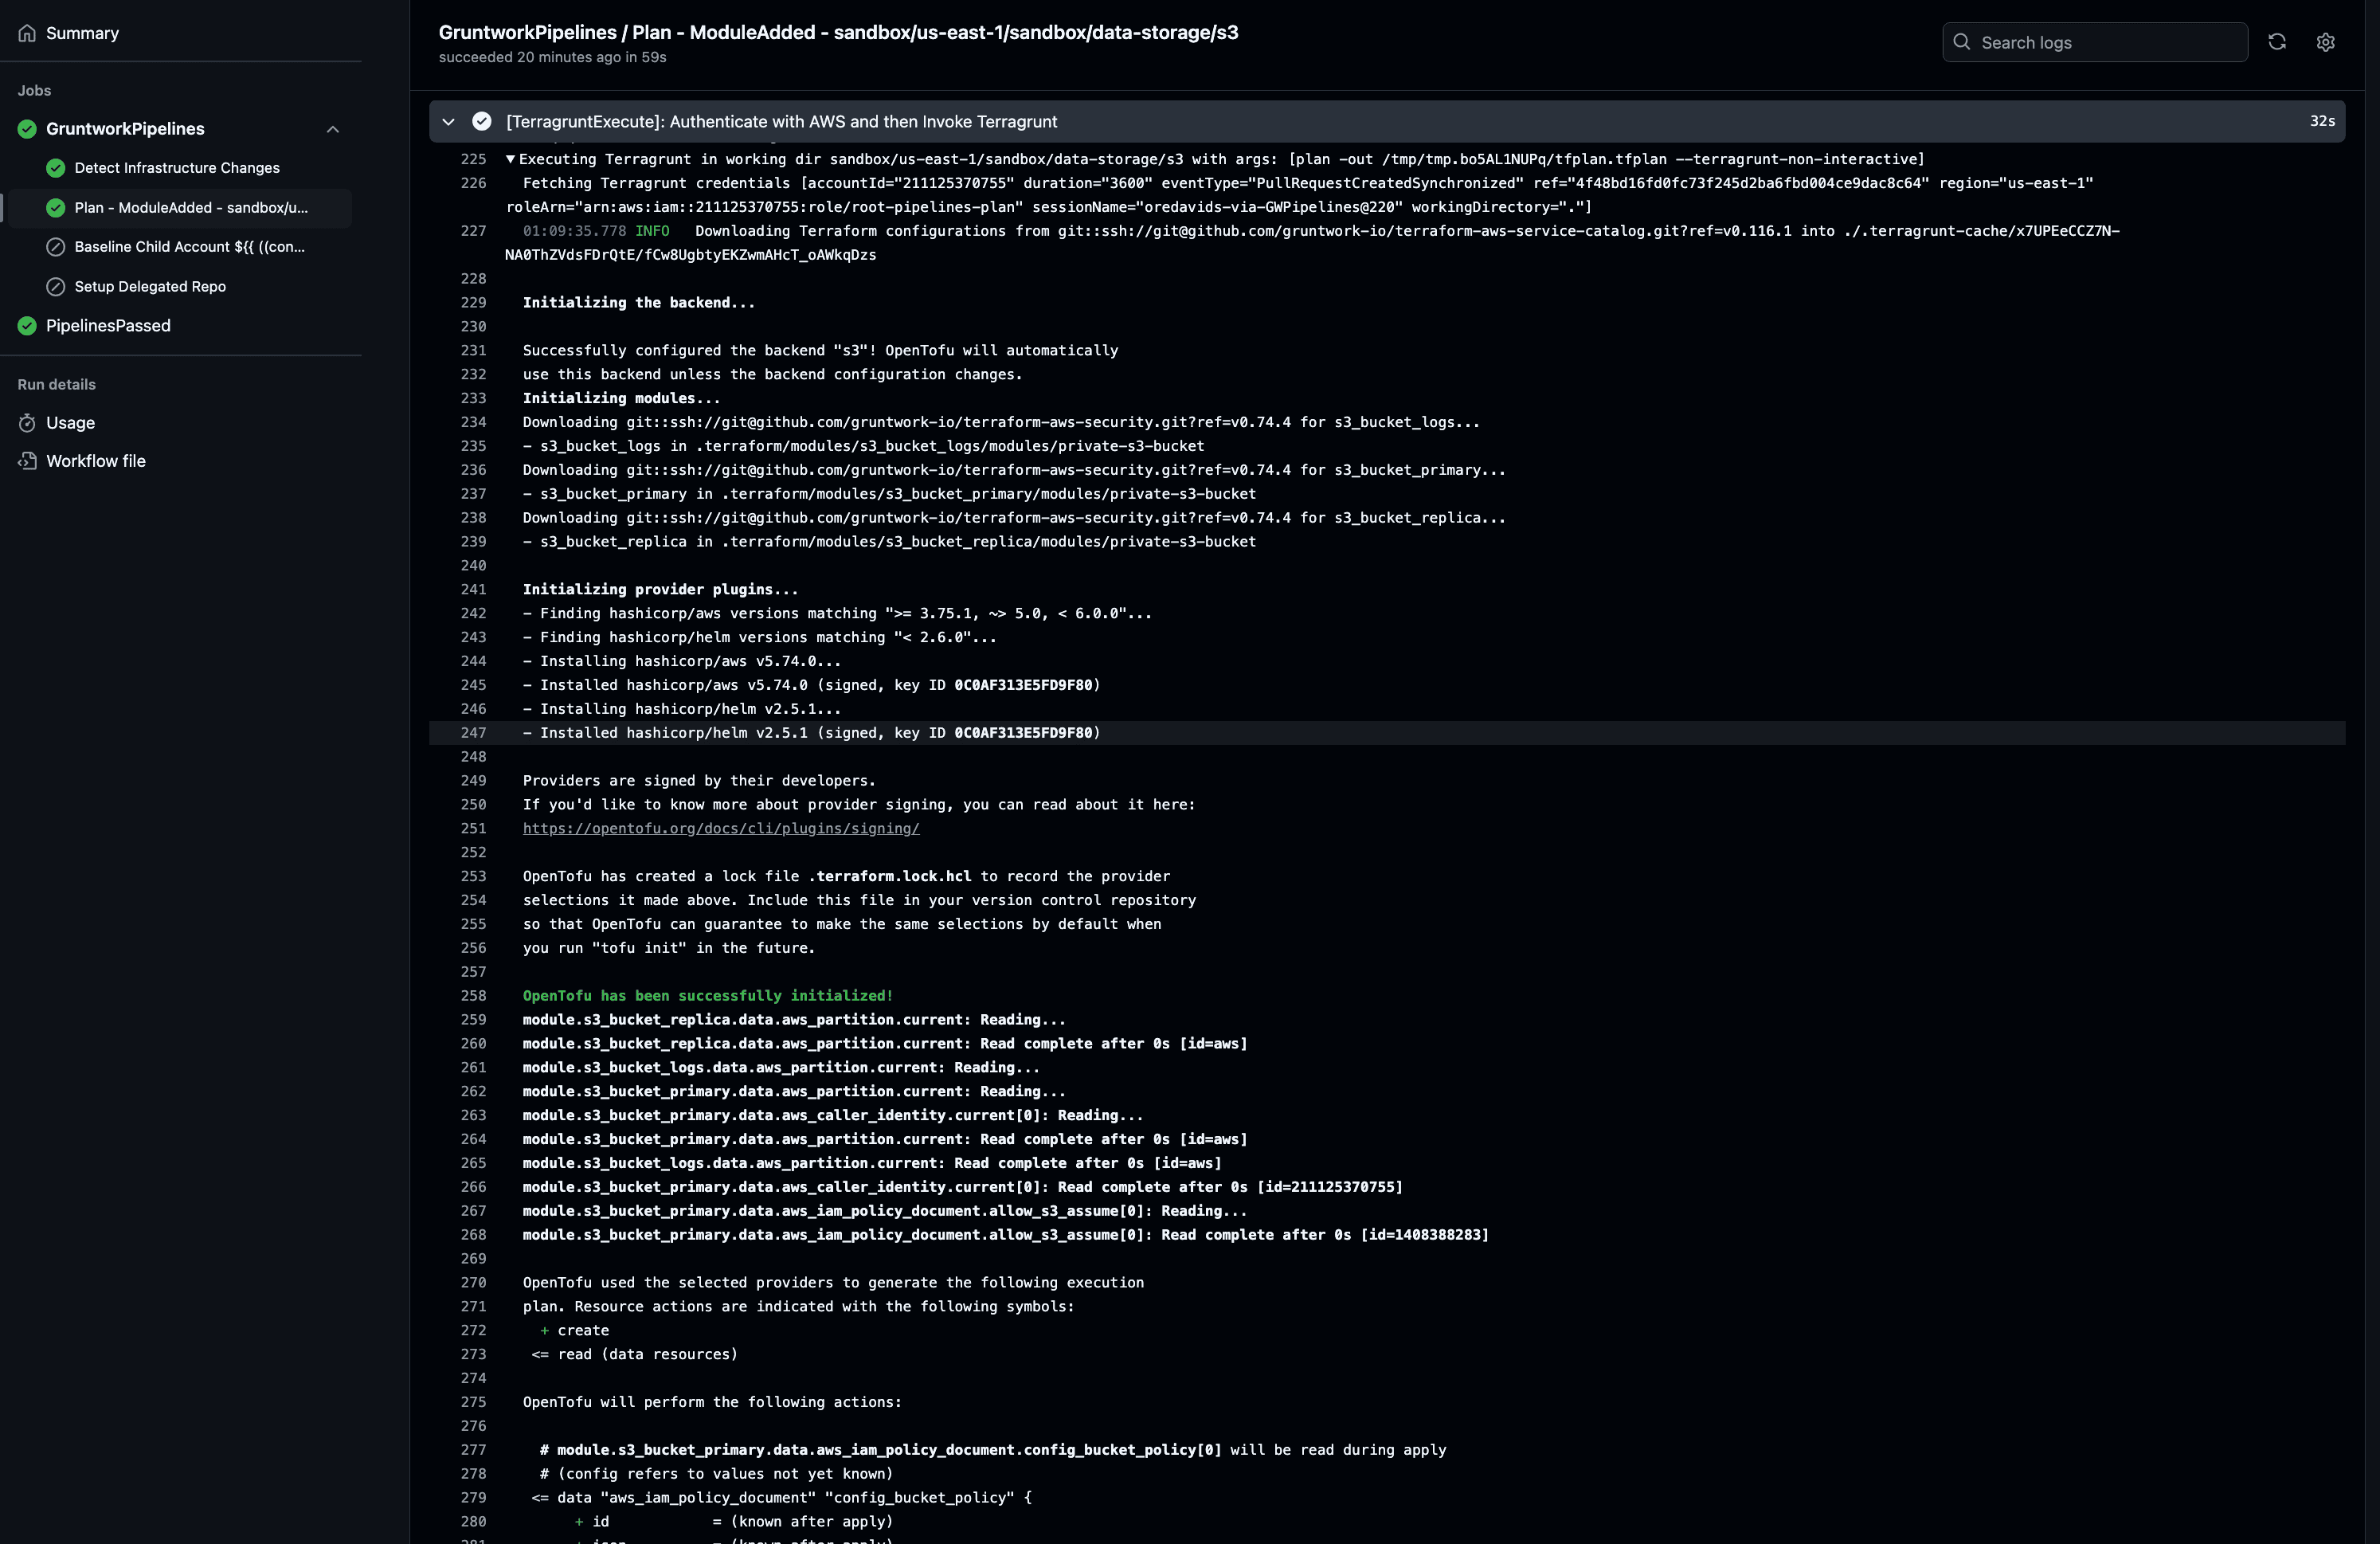 Pipelines Plan Logs
- Create a new branch for your changes.
- Commit the changes to your branch and push it.
- Create a merge request (MR) against
main(the default branch in your project). Refer to this GitLab tutorial for instructions on creating an MR.
After creating the MR, GitLab CI/CD will automatically execute the pipeline defined in .gitlab-ci.yml in your project.
Once the pipeline completes, Pipelines will post a comment on the MR summarizing the terragrunt plan output along with a link to the pipeline logs.
Click the View Pipeline Logs link to see the complete output of the Gruntwork Pipelines run. Select the plan job to review the full terragrunt plan generated by your changes.
Applying the changes
- GitHub
- GitLab
If you are satisfied with the terragrunt plan output, proceed to merge the PR to create the cloud storage resource.
Approve the PR and click the Merge pull request button to complete the merge. Upon merging, Pipelines will automatically execute an apply action to provision the storage resource.
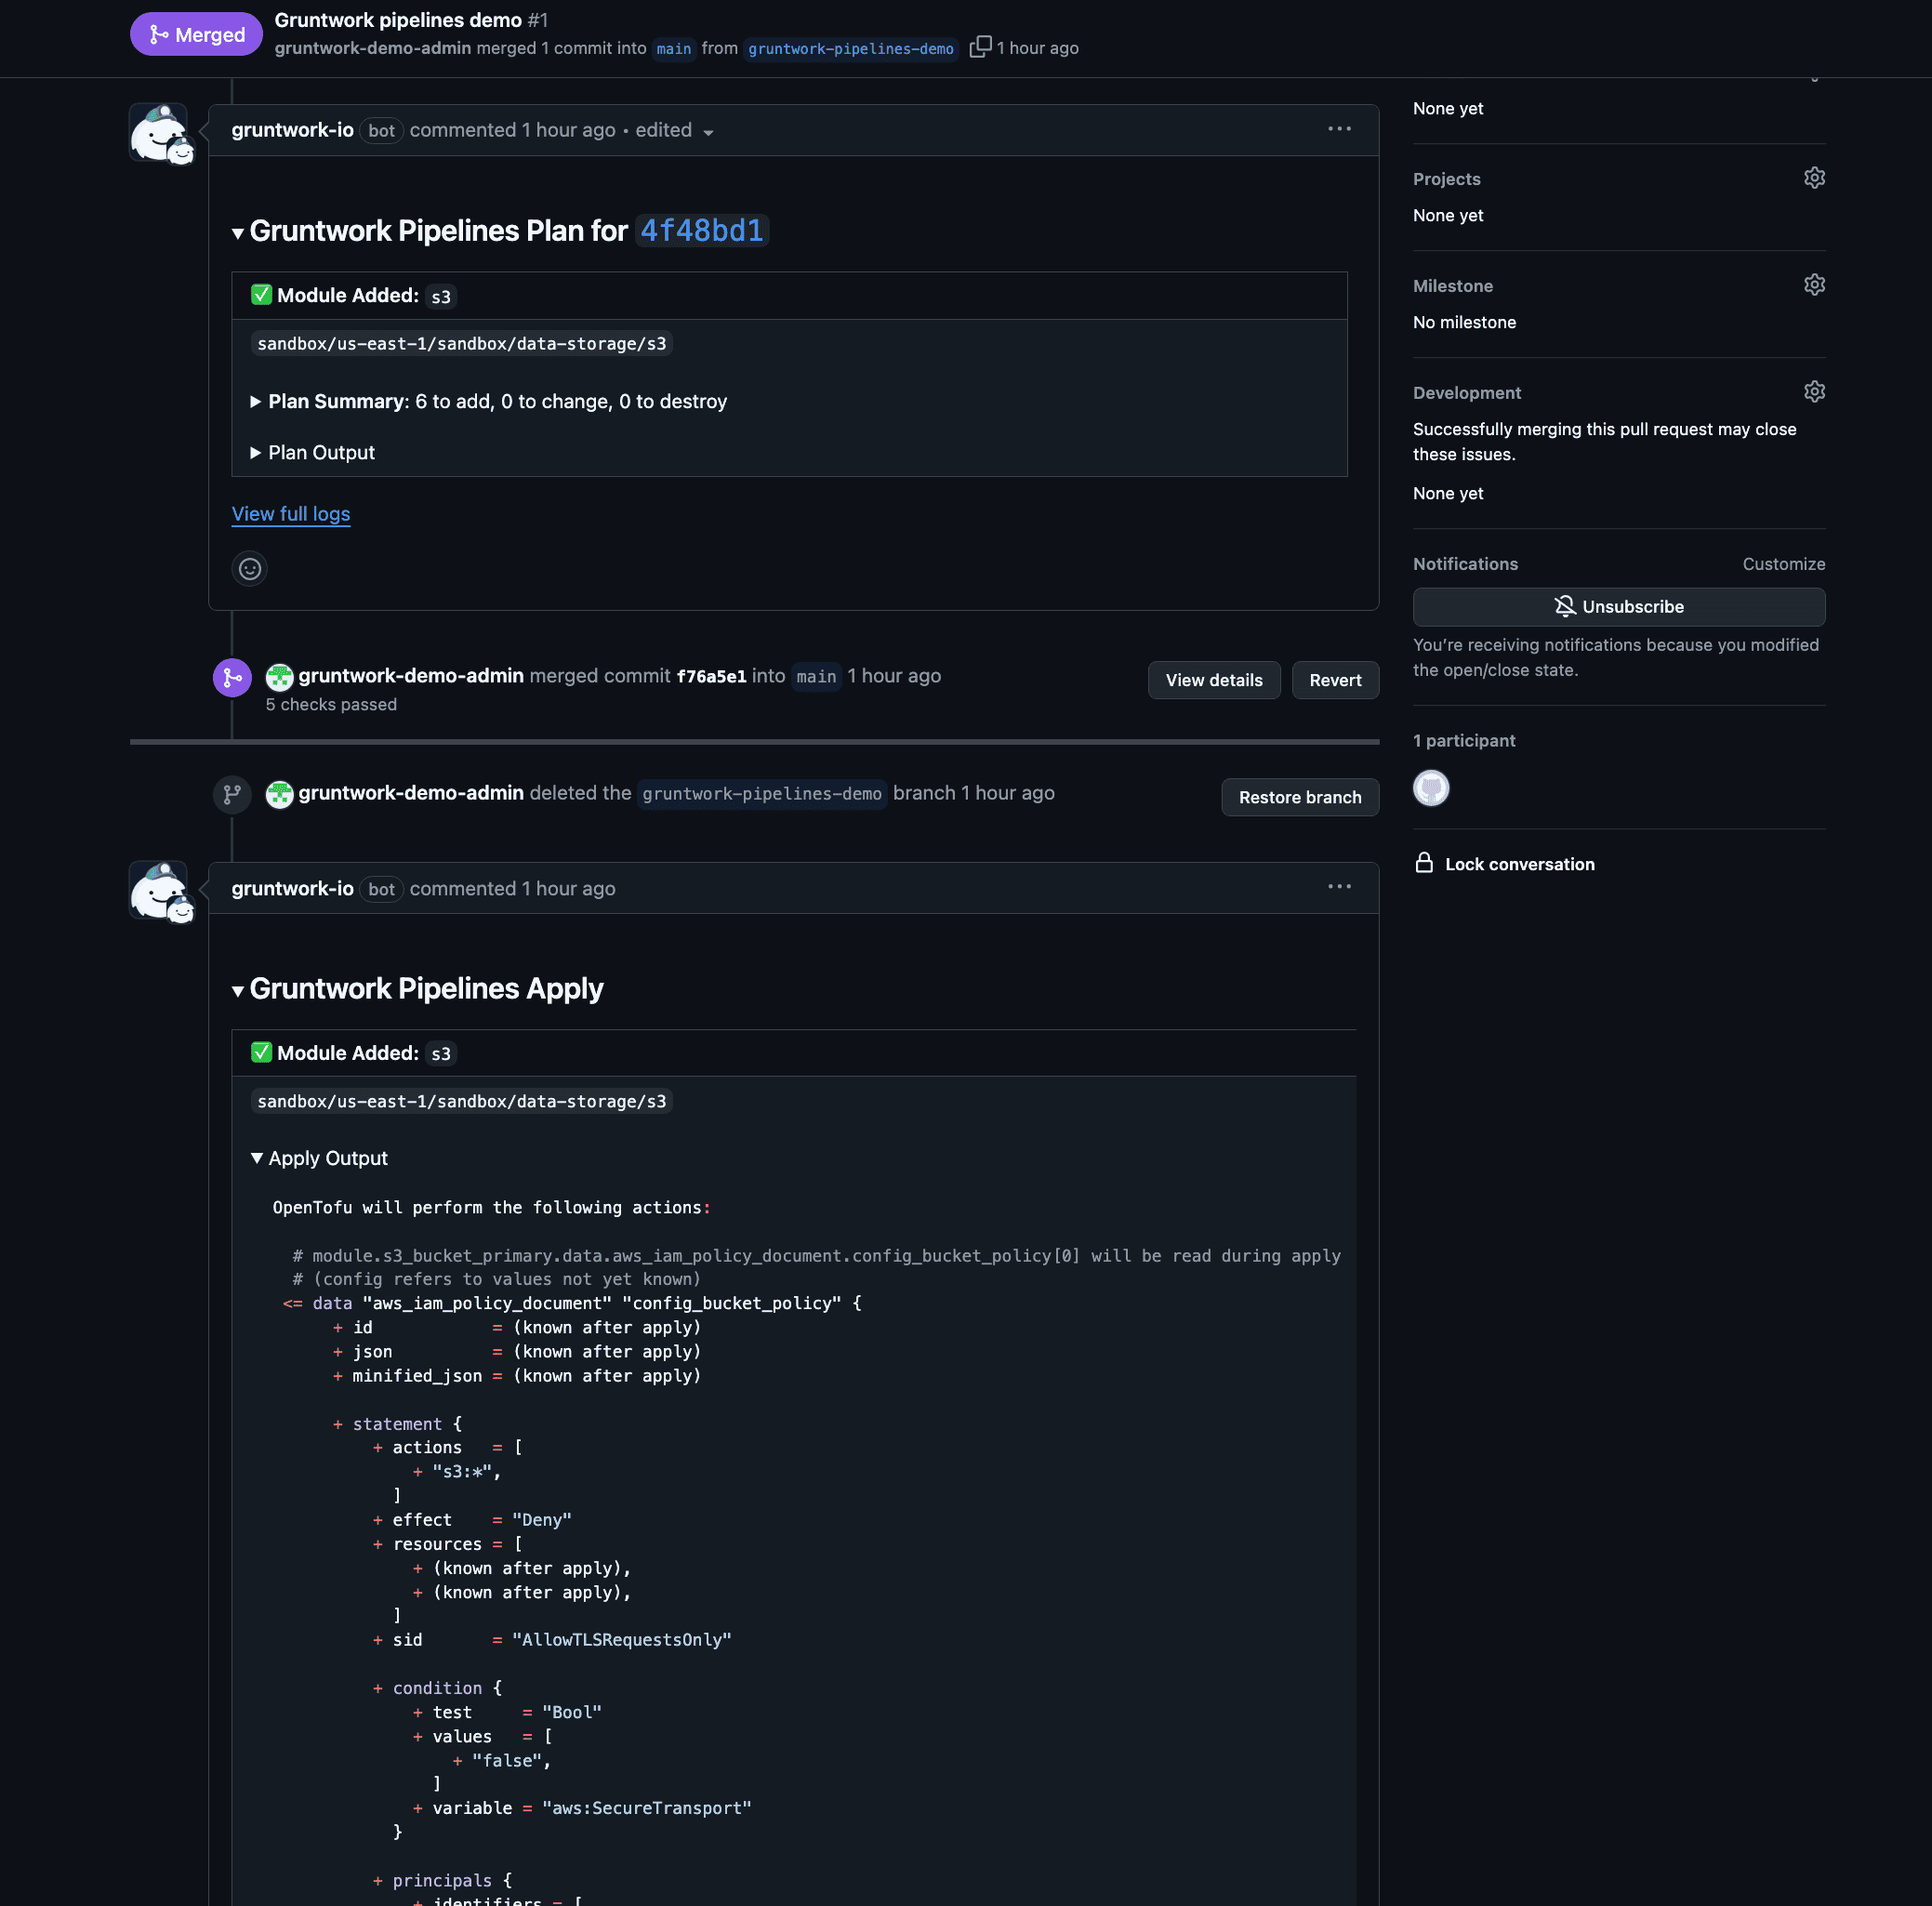 Pipelines Apply Comment
To monitor the workflow run associated with the merged PR:
- Navigate to the
mainbranch of your repository. - Click the Checks icon next to the latest commit at the top of the file explorer.
- Click
detailsnext to the Pipelines workflow to view thedispatchjob logs.
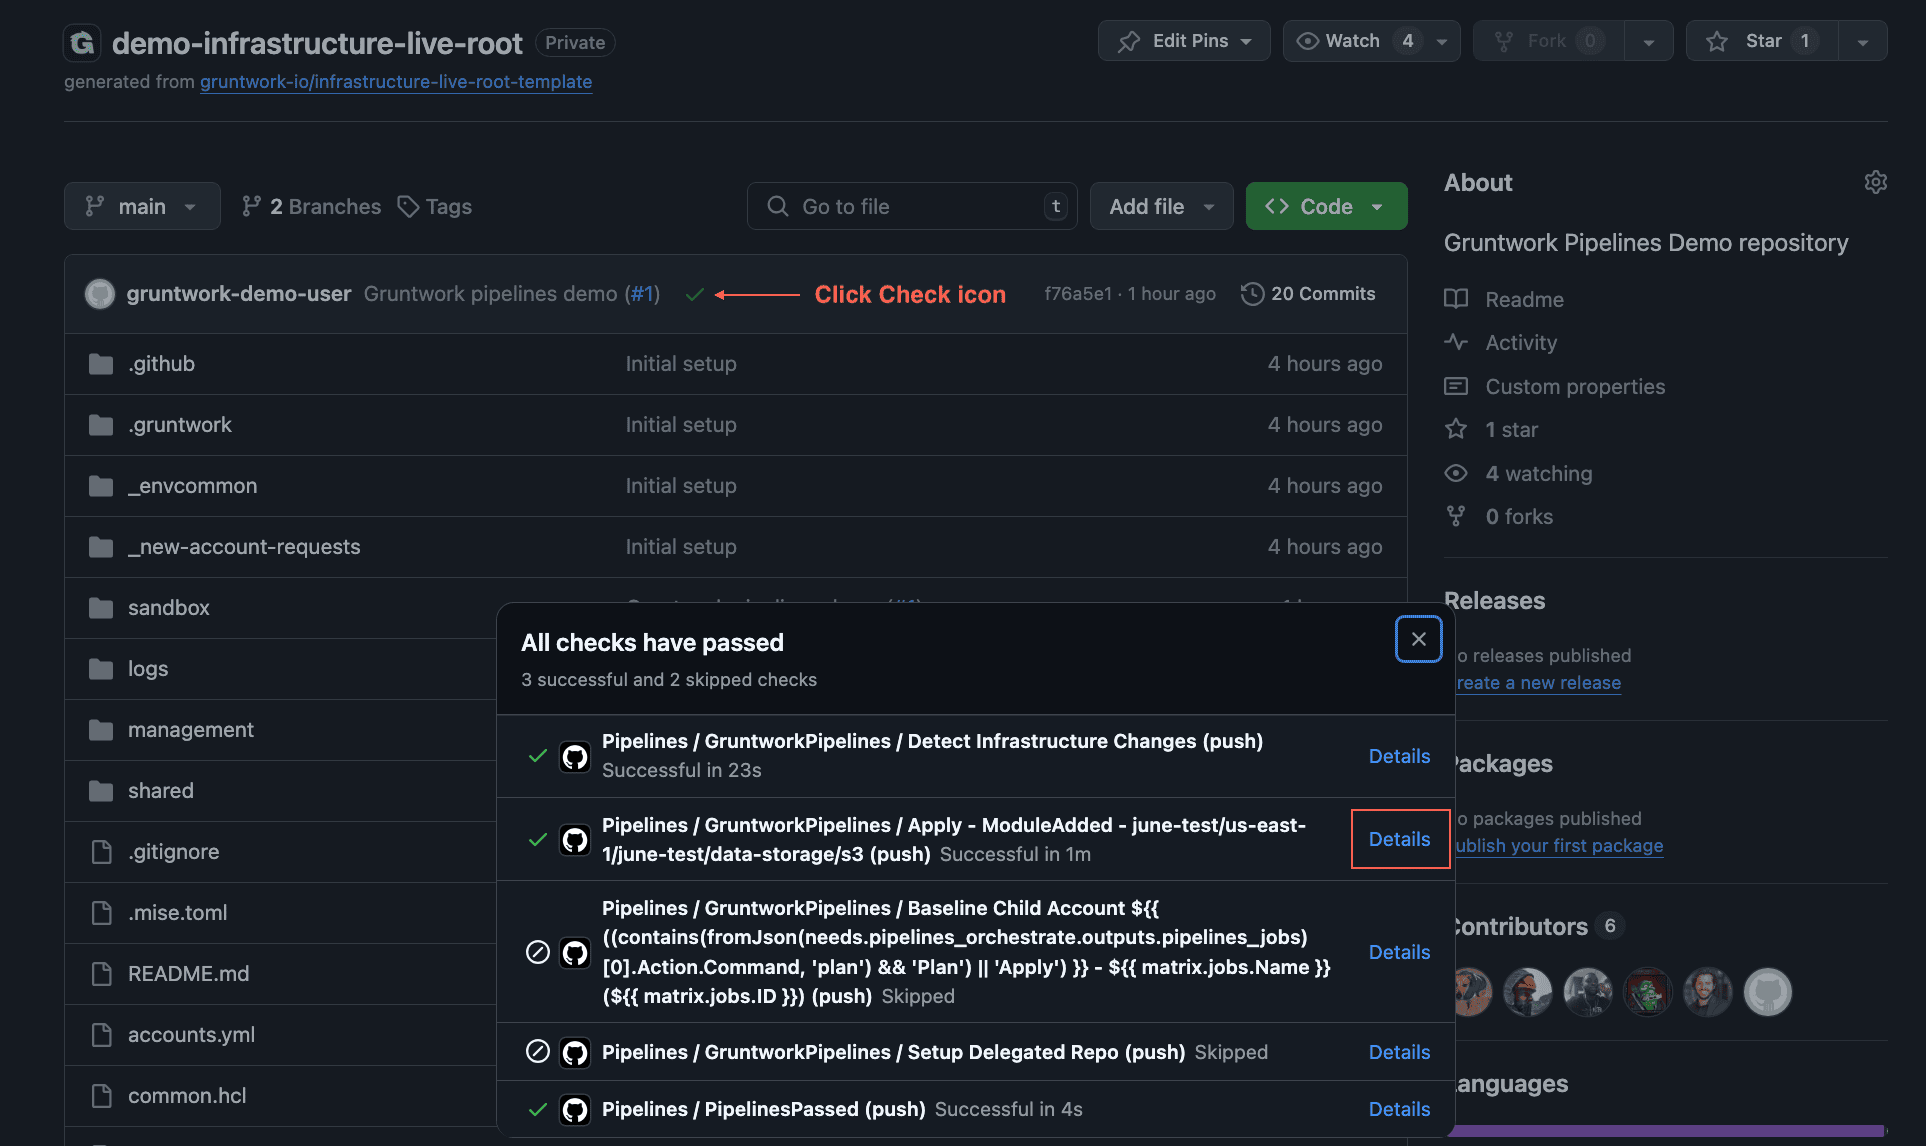 Find Pipelines Apply Logs
If you are satisfied with the terragrunt plan output, proceed to merge the MR to create the cloud storage resource.
Approve the MR and click the Merge button to complete the merge. Upon merging, Pipelines will automatically execute an apply action to provision the storage resource.
To monitor the pipeline run associated with the merged MR:
- Navigate to the
mainbranch of your project. - Click CI/CD > Pipelines in the left sidebar.
- Click on the latest pipeline to view the
applyjob logs.
Congratulations! You have successfully used Gruntwork Pipelines and a GitOps workflow to provision cloud storage.
- AWS
- Azure
- GCP
To verify the S3 bucket creation, visit the AWS Management Console and check the S3 service for the bucket.
To verify the Resource Group and Storage Account creation, visit the Azure Portal and navigate to Resource Groups to confirm both resources were created.
To verify the GCS bucket creation, visit the Google Cloud Console and navigate to Cloud Storage to confirm the bucket was created.
To clean up the resources created during this tutorial, proceed to the next tutorial: Destroying infrastructure with Pipelines.